After the 01st of July, your account will no longer get new information. Basically, what this means is that you have a few days to create your new Google Analytics 4 (GA4) account, in case you haven’t already created one.
However, we do not recommend this option, and neither does Google itself, as they state that you should do it manually since there are differences between the two platforms, which may originate errors in the data.
If you haven’t already created a GA4 property, you might want to have a look at our GA4 implementation guide, in which we explain step-by-step how to implement it.
In this checklist, you can find the main actions you should take after creating your GA4 account, to ensure you take advantage of the tools the platform has to offer.
Data stream is where you can make a number of changes. The data stream offers a wide range of actions that can be performed within the Admin section.
To begin with, there are several events that are automatically tracked, which can be reviewed in the “Enhanced Measurement” section. It is recommended to review these events and disable any that are not relevant to your website. However, leaving them on won’t cause any harm either.
If you’re tracking some of these events through Google Tag Manager (GTM), it’s advisable to disable the corresponding events in the Enhanced Measurement section to avoid having duplicated data. For example, GA4 automatically tracks file downloads, so it’s essential to disable this option if you’re already tracking file downloads with GTM to avoid having duplicated events.
In GA4 you can create events, but keep in mind that only events from existing events. What this means is that you can create events in the platform, but from the events that are available.
Although this can be a good option if you don’t know how to work with GTM, there are some limitations. For instance, you won’t be able to track e-commerce data or specific form submissions. Although GA4 can in fact track form submissions, if you have more than one form on the website, it will be more difficult to distinguish which one was triggered.
We recommend creating events that align with your specific needs and objectives. However, here are some of the events a “normal” website has: telephone clicks, form submissions or button clicks. If your website is an online store, then, you might also want to create events related to e-commerce, such as purchase (this one comes by default), add to cart, view product, checkout, among others. On the other hand, if your website is a blog or an online source of information such as a newspaper, consider implementing scroll depth.
The number of events is always dependent on the website itself and the business objectives. Regardless of the events you create, keep in mind that the name of the events must follow some guidelines. Below, we present the most important ones:
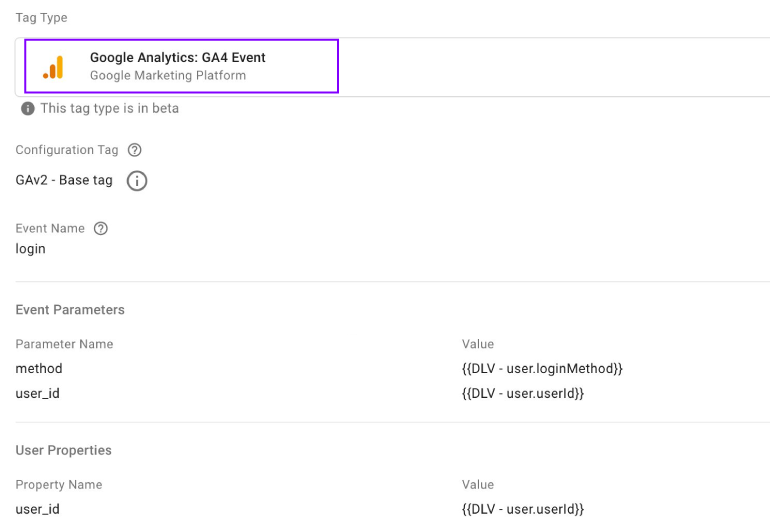
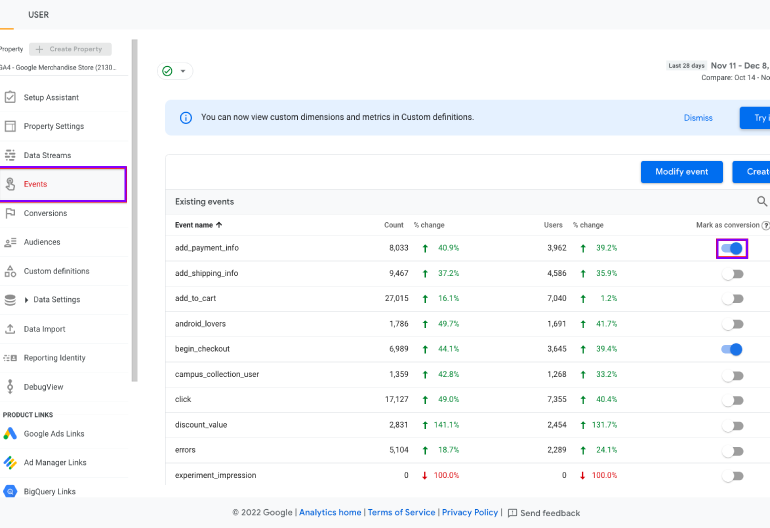
After you define and create your events, you must choose the ones that will be considered conversions. You can find both events and conversions in the Admin section of GA4.
And to do that, you must understand the difference between them. Basically, all conversions are events, but not all events are conversions. Confused? Allow us to clarify: an event is considered a micro conversion, that is, a minor action performed by a user that doesn’t lead directly to a conversion at that moment. It act as a touchpoint within the user journey. Examples of these actions include button clicks, scroll depth, newsletter submissions, video watching, etc. These actions can bring results, but in the long run.
On the other hand, a conversion is an action that brings revenue or potential revenue in the present moment. These are macro conversions, and it could be a purchase, or a form submission, for instance from someone asking for a quote. So, to conclude, events are small touchpoints and conversions bring revenue in the present moment.
It is normal to have more events than conversions, since conversions are very specific actions. So which ones should you choose as conversions? Well, again, it depends mainly on the business objectives and the website. By now you should understand the difference and be able to choose between both.
When you create an event, it can take a few hours to start receiving data. Also, when you create it, in the “Events” section, you can then choose which ones will be considered conversions. And to do so, you just have to “mark them as conversions”.
There are several platforms that you can connect to your GA4 account. From all those you can link, we suggest at least two: Google Ads and Google Search Console. You can do that in the Admin section, then search for “Product links”. In both cases, it’s a very intuitive process. It’s easier if you login with the same email address that you use for all three platforms. Unless you manage many accounts, you will immediately see your properties.
Tips:
Audiences will allow you to segment your website visitors, and analyze each group individually. Audiences are not retroactive, meaning that when you create an audience, it will start to receive data from the moment you create them. This is important mainly for Google Ads, since if you want to do any remarketing campaigns, the audience must have a minimum number of users. Therefore, the sooner you create them, the sooner they will have the required number of users.
Tip: audiences are imported automatically to Google Ads after being created in GA4.
For those who are familiar with Universal Analytics, bounce rate is one of the most important metrics, as it gives you valuable insights about the relevance of your pages and content.
In GA4, bounce rate was initially absent but was later reintroduced by Google. Additionally, Google introduced the “Engagement rate” metric as a counterpart to bounce rate. The engagement rate represents the inverse of the bounce rate. For example, if your engagement rate is 30%, it implies that your bounce rate should be around 70%.
If you prefer to monitor your bounce rate in GA4, you need to manually add it to your reports as it’s not included by default. Here’s how you can do it:
In GA4, the “Explore” section provides the ability to create personalized reports for more comprehensive analysis. However, there is a small default limitation: data in this section is only available for the past two months. Fortunately, you can extend this timeframe to have a broader dataset.
To change this setting, follow these steps:
Please note that this change specifically applies to the Explore section, while other reports have no time limitations.
In this section, you can personalize your reports. You can add new reports or even remove the ones you don’t need. For example, if your website isn’t an e-commerce site, you can remove the “Monetisation” section. Or, if you prefer, you can add reports you were accustomed to in Universal Analytics.
Eventually, in the future, the list may change, as Google is still adding more functionalities to the platform, but for now, these are the ones we recommend.
Do you have any doubts or questions? Feel free to reach out. We can surely help you.
Images by Data Driven via Colleen Burton | Simo Ahava | Support Google | Digital Debrief